![]()
In this blog, I wanted to do a quick write-up on how to automate the deployment of a Angular 5 application to Azure using angular-cli, GitHub, Octopus Deploy and TeamCity.
Caveats!
In this blog, I assume that you are familiar with:
- Angular 5+
- angular-cli
- Azure
- GitHub
- Node Package Manager
- Octopus Deploy
- Teamcity
- Visual Studio 2017
I also assume that you have the proper Teamcity plugins for Node.js and Octopus Deploy installed.
Octopus Deploy Part 1
To get started, you will need to allow Octopus Deploy to access your Azure Subscription and you do this by creating a Azure Active Directory Application and an Azure Service Principal Account. To avoid redundancy, Octopus Deploy has a very easy to follow guide on how to do this and it can be found here. Once you have done this, move on to the next portion of this blog.
Create the Sample Angular 5 Application!
Next, we will want to create a basic Angular 5 application using angular-cli so that we can deploy it to Azure.
- Open up Git Bash and navigate to a directory of your choosing and type:
ng new NEWPROJECT
- Open Visual Studio and in the new directory that angular-cli created, make a new blank solution project. Inside of the new solution, add a Class Library (.NET Framework).
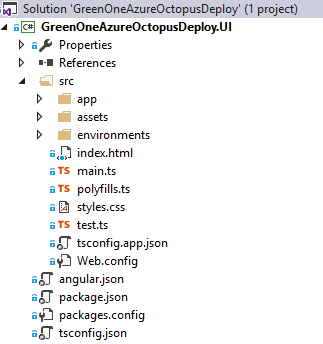
Note: I did this more for organization and to take advantage of TypeScript compile time checking. - Next, you will want to select the Class Library, choose Show All Files in Solution Explorer and add the files and directories that I have in the picture below:
 7. Next, you will want to add a Web.config to the solution and place it in the src root directory. You can use the Web.Config that I created, which you can find on GitHub:
- Next, open up the angular.json file, find the assets property under build and an entry for the Web.config. This will place the Web.config in the dist folder when you build the Angular 5 application using angular-cli
- Next, you will need to install the OctoPack NuGet Package, which allow TeamCity to create and push the compiled application to Octopus Deploy.
- Last, compile the solution in Visual Studio and run the following commands in Git Bash to compile and run the Angular 5 application:
ng build && ng serve
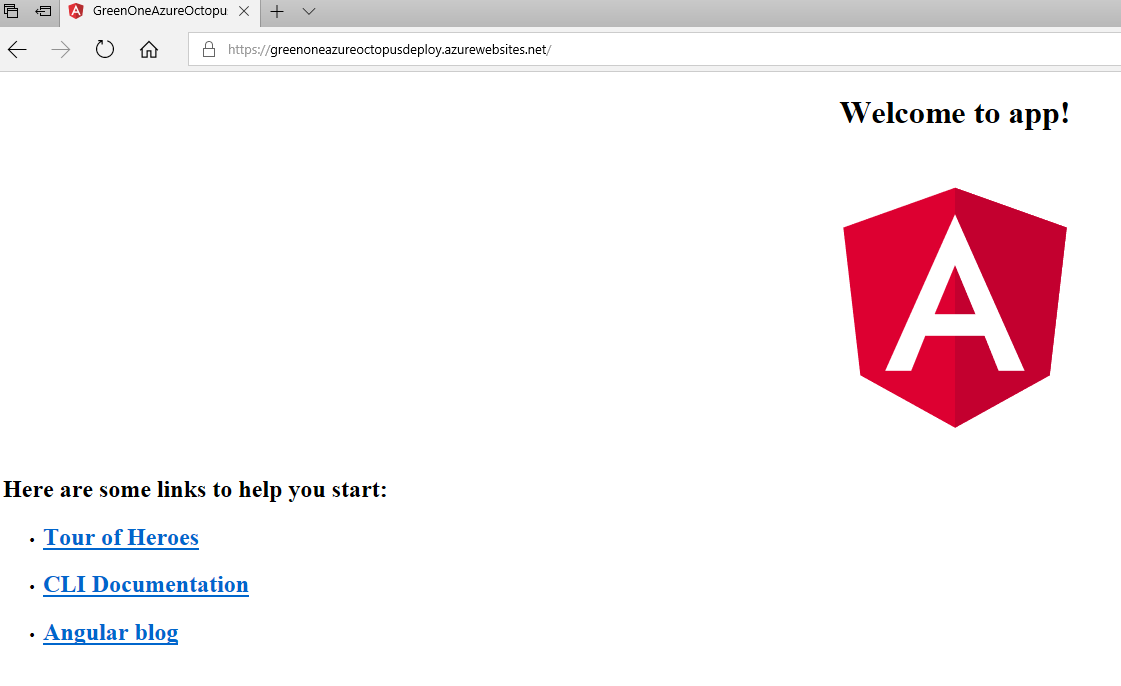
If the Angular 5 application compiles, you should be able to navigate to http://localhost:4200 and see the default Angular 5 application. You will now want to create a GitHub repository for the new project and commit all changes. The GitHub repository I created for this blog can be found here.
Create the TeamCity Project!
As stated, I assume you are familiar with TeamCity. You will want to create a new TeamCity Project and a new Build Configuration. You will want to configure the Project and Build to monitor the GitHub repository you just created.
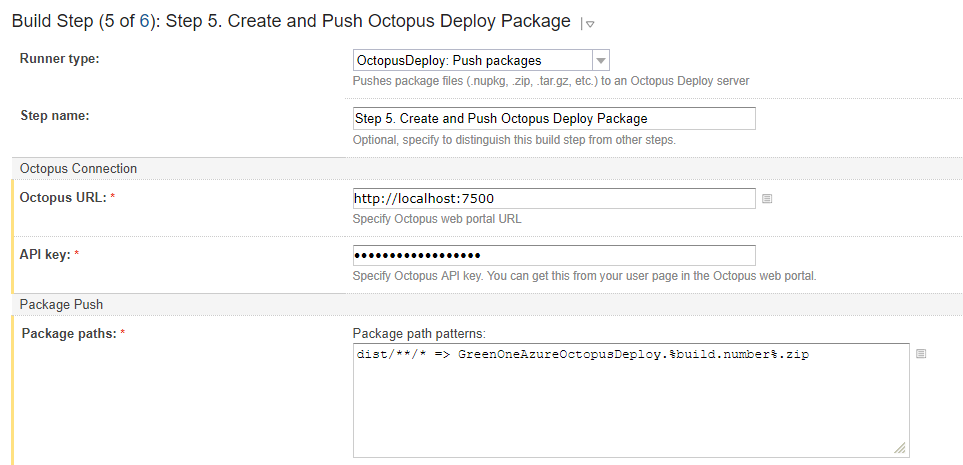
Now, it is time to create the Build Configuration Steps:
- Restore NuGet Packages:

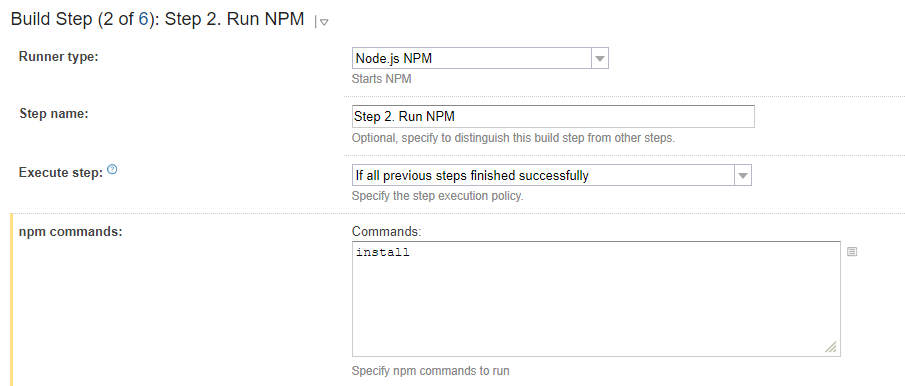
- Run NPM:
- Build Solution:

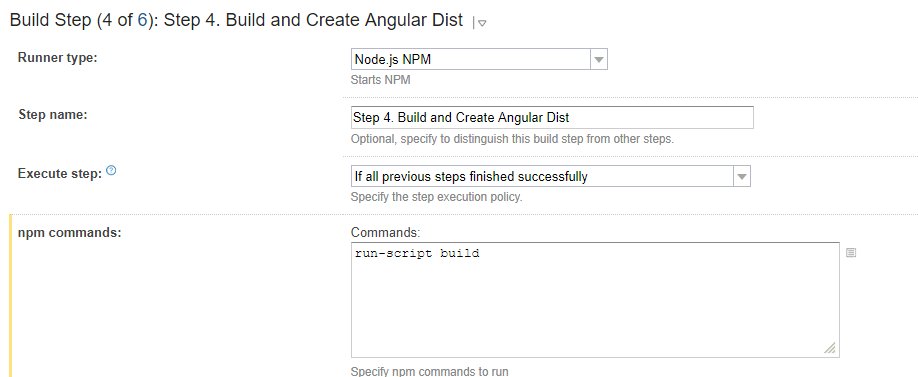
- Build and Create Angular Dist.
Note: This step will create the dist folder, which is the compiled release assets that you will deploy to Azure. The Node.js command run-script build will trigger the angular-cli ng build command. See Stackoverflow for more details:
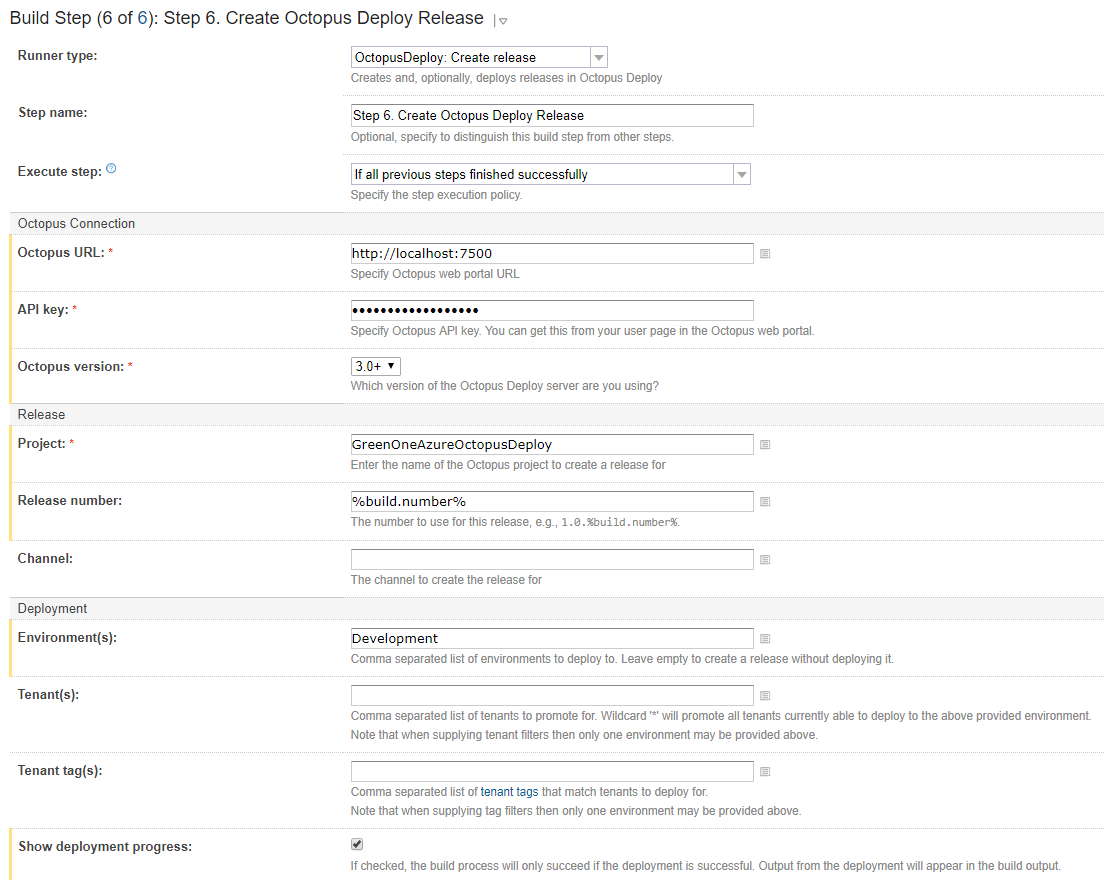
That is pretty much it for TeamCity.
Create the Azure Web App!
Next, you will want navigate to the Azure Portal and create an Azure Web App. Once you create the Azure Web App, you will want to navigate to the Azure Web App’s Diagnostics logs blade and get the FTP information, so you can use an FTP client such as FileZilla to verify that Octopus Deploy deployed your Angular 5 application correctly.
Octopus Deploy Part Deux!
The final step is to create a new Octopus Deploy Project that will deploy your Angular 5 application to Azure via the Azure Web App you just created.
- In Octopus Deploy, create a a new Octopus Deploy Project.
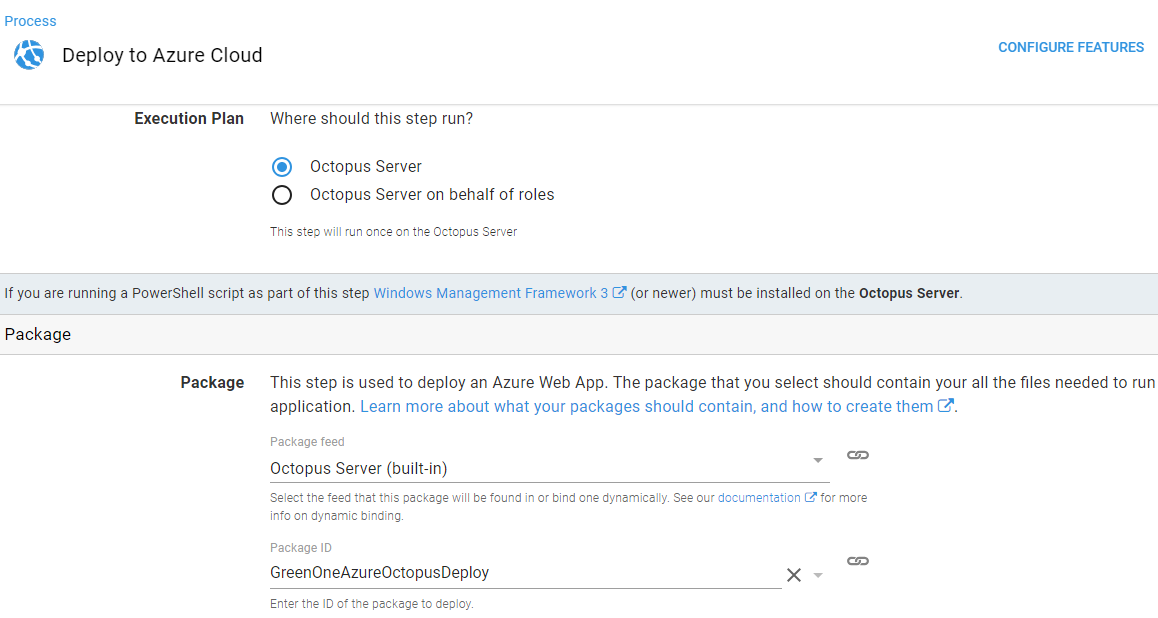
- Once the new project is created, choose Process, choose Add Step and choose the_Deploy an Azure Web App_template
- Fill in the Step Name
- Under Package, the Package ID will be the name of your new Octopus Deploy Project
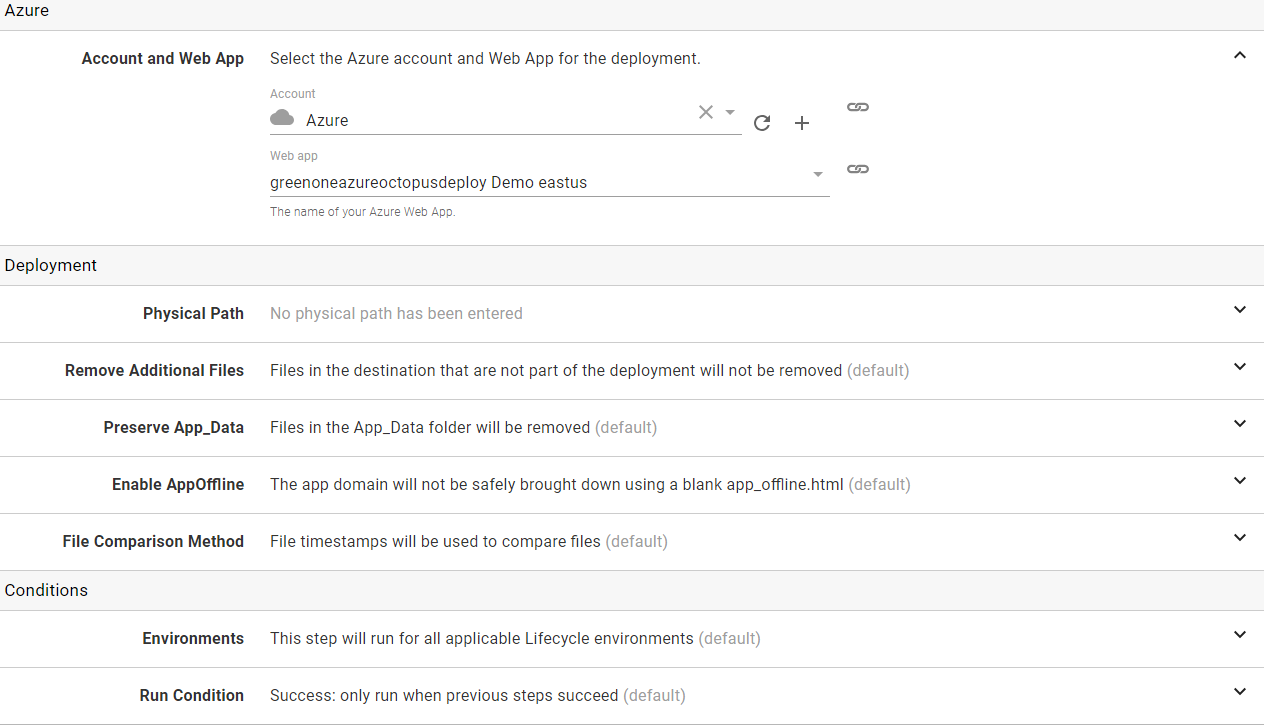
- Under Azure, choose the Account that you created when you created the Azure Active Directory Application and the Service Principal using Octopus Deploy’s documentation I mentioned earlier in this blog entry. In the Web App dropdown, you should see the Azure Web App you created.
Here is what my process looked like when I was done:
Let’s Deploy!
Before we deploy, let’s recap what we have done:
- Created a Azure Active Directory Application and Service Principal to allow Octopus Deploy to communicate with Azure
- Created a sample Angular 5 Application and pushed the changes to GitHub
- Created a new TeamCity Project to Build and Push the Angular 5 Application to Octopus Deploy
- Created a new Azure Web App, which is where the Angular 5 Application will be deployed
- Created a new Octopus Deploy Project, using one of the built in Azure Templates to deploy the Angular 5 Application to Azure
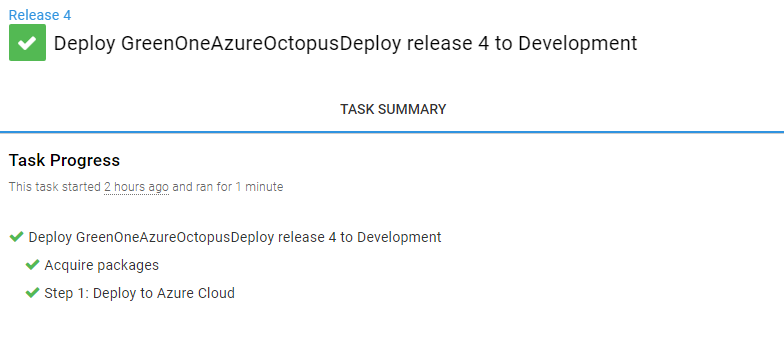
Let’s head back to TeamCity and deploy the Project (alternatively, you could just make a change to the Angular 5 application and push the changes to GitHub). If everythting works out you should see:
In TeamCity:

In Octopus Deplpoy:
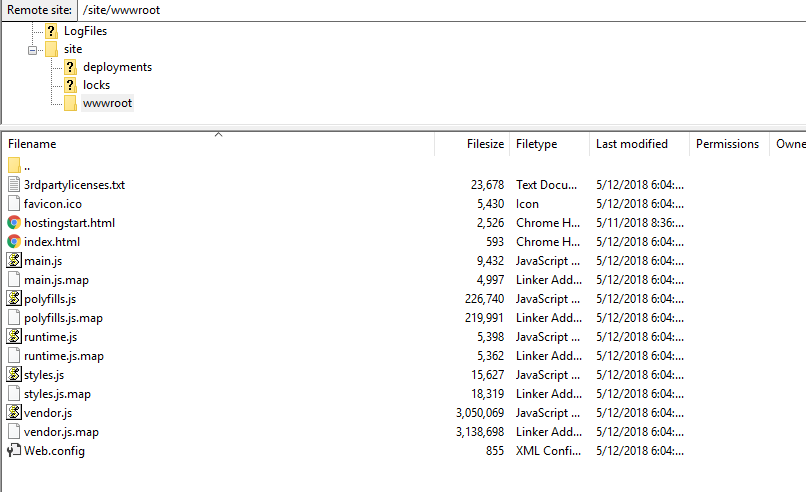
In FileZilla (FTP to Azure Web App Site):
Last but not least, you should be able to view your Angular 5 Application via your Azure Web App url: