![]()
I recently had to use the new Azure Storage SDK V10 for JavaScript library to upload files to Azure Storage for a Microsoft partner here at Microsoft. Due to the fact that this library is fairly new, when I implemented the functionality, there were not many examples of how to use the library with Angular 7.
I wanted to take some time to write a blog entry that demonstrates how to use the Azure Storage SDK V10 for JavaSCript library with Angular 7 to upload files to Azure Storage.
You can find the complete source code here on github.
Prerequisites!
- angular-cli
- Azure Account
- Basic knowledge of Angular
- Basic knowledge of the Azure Portal
- Bash or Terminal
- Node Package Manager
Create an Azure Storage Account & SAS Token!
First, you will want to create a Azure Storage Account. I will be using the Azure Portal to create the Storage Account. Please note that we could use the Azure Storage Emulator but I felt for the purpose of brevity, it would be much easier to just create a real Azure Storage Account.
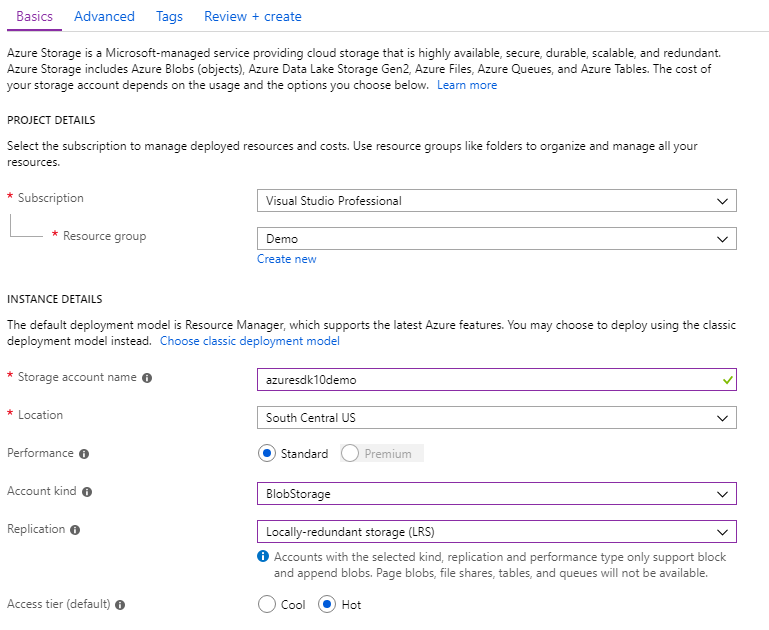
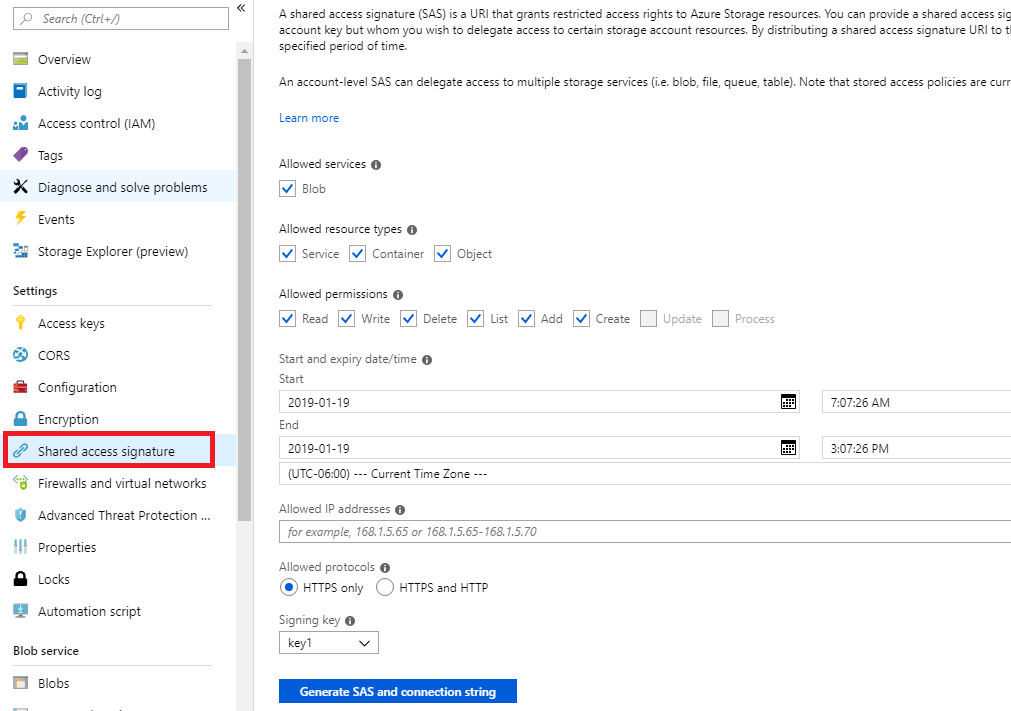
After you have created the Azure Storage Account, you will now want to create the SAS Token to allow your Angular 7 application to upload files to the Azure Storage Account. Select your newly created storage account in the Azure Portal. You will then want to select shared access signature and for the purpose of this demo, leave all the default settings. Also, once you generate the SAS Token, you will want to copy the Blob service SAS URL.

Next, you will want to configure the CORS settings for the Azure Storage Account. You will want to select CORS and enter the following:

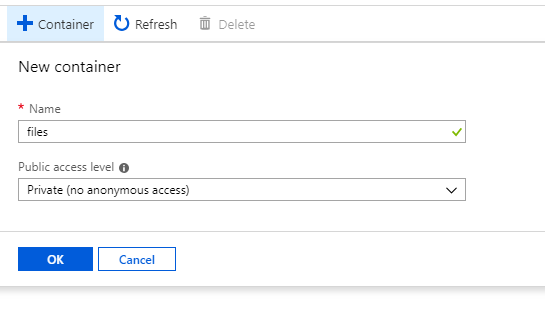
Last but not least, we will want to create a container inside of the Azure Storage Account to store our blob files. Select Blobs and create a container:
Create the Angular 7 Application!
First, you will want to open up a Bash/Terminal prompt and type the following to create a new angular project:
ng new angular7-azure-storage-sdk-v10-demo
After the new Angular project has been created, navigate to the new project’s directory. You will want to install the Azure Storage SDK V10 for JavaScript Library. In the Bash/Terminal prompt, type the following:
npm install @azure/storage-blob --save
Next, I am going to create a Angular service that contains the code used to upload a file to Azure Storage.
ng g service azure-storage/blobStorage
Inside of the BlobStorageService, import the following modules:
    import {
      AnonymousCredential,
      BlobURL,
      BlockBlobURL,
      ContainerURL,
      ServiceURL,
      StorageURL,
      Aborter,
      uploadBrowserDataToBlockBlob,
      BlobUploadCommonResponse,
    } from '@azure/storage-blob';
    import { TransferProgressEvent } from '@azure/ms-rest-js';
    import { BehaviorSubject } from 'rxjs';
Next, we need to create the private method that will be used to provide percentage uploaded information. This method uses Azure Storage SDK V10 TransferProgressEvent event to provide these details:
      private onProgressChanged(transferProgressEvent: TransferProgressEvent, file: File,
        uploadProgressSource: BehaviorSubject) {
          const percentCompleted: number = Math.round((transferProgressEvent.loadedBytes / file.size) * 100);
          uploadProgressSource.next(percentCompleted);
      }
Next, we will want to create a function that will determine the blocksize based on the file size you are trying to upload. Basically, if the file is larger than 32MB the block sizes will be 4MB, else 512KB.
      private getBlockSize(file: File): number {
        const size32Mb = 1024 * 1024 * 32;
        const size4Mb = 1024 * 1024 * 4;
        const size512Kb = 1024 * 512;

        return file.size > size32Mb ? size4Mb : size512Kb;
      }
Next, we need to create two variables, one that is private and one that is public. The private _uploadProgressSource variable is a BehaviorSubject that will be passed to the onProgressChanged method (the code that performs this will be shown later) and will be updated each time a block is uploaded.
The public uploadProgress is an observable used to observe the _uploadProgressSource variable and will be used to display this information to the user.
      private _uploadProgressSource = new BehaviorSubject(0);
      public UploadProgress = this._uploadProgressSource.asObservable();
Now it is time to create the function that uploads the file to Azure Storage.
      public async uploadBlobToStorage (file: File): Promise {
        const anonymousCredential = new AnonymousCredential();
        const pipeline = StorageURL.newPipeline(anonymousCredential);
        const serviceURL = new ServiceURL(
          `PASTE BLOB SERVICE SAS URL HERE`,
          pipeline
        );
        const containerName = "files";
        const containerURL = ContainerURL.fromServiceURL(serviceURL, containerName);
        const blobName = `${file.name}-${new Date().getTime()}`
        const blobUrl = BlobURL.fromContainerURL(containerURL, blobName);
        const blockblobURL = BlockBlobURL.fromBlobURL(blobUrl);
        const options = {blockSize: this.getBlockSize(file), parallelism: 10, progress: (transferProgressEvent: TransferProgressEvent) => {
          this.onProgressChanged(transferProgressEvent, file, this._uploadProgressSource);
        } };
        const blobUploadCommonResponse = await uploadBrowserDataToBlockBlob(Aborter.none, file, blockblobURL,options);

        return blobUploadCommonResponse;
      }
The uploadBlobToStorage method will be called from any component to upload a file to Azure Storage. Noticed that it is an async method and returns a Promise of type uploadBlobToStorage.
You will want to paste the Blob service SAS URL that you got from the Azure Portal into the ServiceURL constructor.
The options variable is of type IUploadStreamToBlockBlobOptions and is used to configure upload options:
- blockSize: Used to set the Block Size. I am using the getBlockSize method.
- parallelism: Used to set the number of concurrent block uploads. I have hardcoded it to 10.
- progress: Anonymous function that allows you to implement code that fires whenever there is progress on an upload. Here we are calling the onProgressChanged method.
There are other parameters that I am not using and you can find the API for the Azure Storage SDK V10 library here
We then call the Azure Storage SDK V10 library’s uploadBrowserDataToBlockBlob function to start the upload process.
Next, we will need to add the BlobStorageService to app.module.ts:
    import { BrowserModule } from '@angular/platform-browser';
    import { NgModule } from '@angular/core';
    import { AppComponent } from './app.component';
    import { BlobStorageService } from './azure-storage/blob-storage.service';

    @NgModule({
      declarations: [
        AppComponent
      ],
      imports: [
        BrowserModule
      ],
      providers: [BlobStorageService],
      bootstrap: [AppComponent]
    })
    export class AppModule { }
Now that we have implemented the base functionality to upload a file, we will implement the UI logic to call this code. In app.component.ts, import the following:
    import { BlobStorageService } from './azure-storage/blob-storage.service';
    import { from, Observable } from 'rxjs';
    import { BlobUploadCommonResponse } from '@azure/storage-blob';
In the constructor, you will want to inject the BlobStorageService:
constructor(private blobStorageService: BlobStorageService) {}
Next, declare the following app.component variables:
      private _response: BlobUploadCommonResponse;
      public UploadStarted: boolean = false;
      public UploadCompleted: boolean = false;
      public UploadProgress: Observable;
Next, we need to create the private method which will call our BlobStorageService to start the upload process.
      private uploadFile(file: File) {
        this.blobStorageService.uploadBlobToStorage(file).then(response => {
          this._response = response;
          this.UploadCompleted = true;
          this.UploadStarted = false;
        }).catch(error => {
          this._response = error;
          this.UploadCompleted = true;
          this.UploadStarted = false;
        });
      }
Now we need to create the public onFileChange method the UI will call when the user selects a file. This method will ultimately call the uploadFile method. Note, we are only allowing 1 file to be uploaded at a time, so we only choose the first file in the event.target.files array.
Also notice that the public UploadProgress variable is being set to the BlobStorageService uploadProgress observable.
      public onFileChange(event: any): void {
        const file = event.target.files[0];
        this.UploadStarted = true;
        this.UploadProgress = this.blobStorageService.UploadProgress;
        this.uploadFile(file);
      }
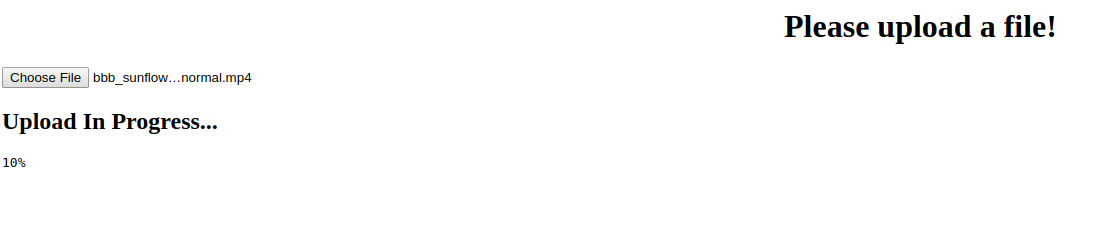
Next, open app.component.html and paste the following:
        <div style="text-align:center">
        <h1>
        Please upload a file!
        </h1>
        </div>
        <input type="file" (change)="onFileChange($event)">
        <div *ngIf="UploadStarted">
        <h2>Upload In Progress...</h2>
        <pre>%
        </pre>
        </div>
        <div *ngIf="UploadCompleted">
        <h2>Upload Complete!</h2>
        </div>
Now that coding is complete, it is time to run our app and upload a file to Azure Storage. In the Bash/Terminal prompt type the following:
ng serve
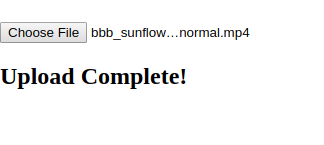
Once the app is running, navigate to http://localhost:4200 and you should see:

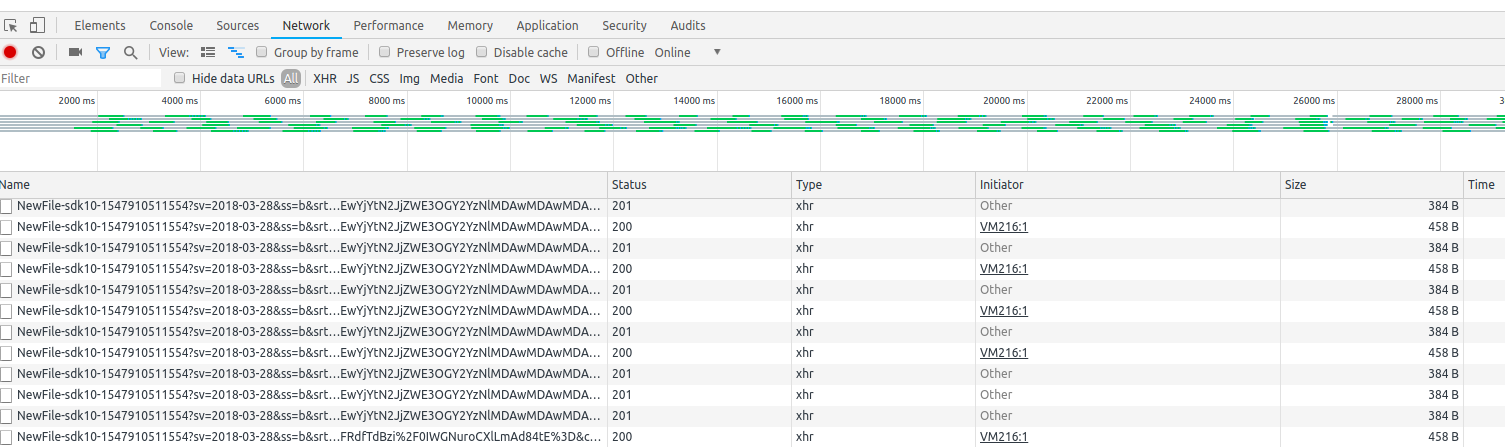
Open up Developer Tools in the browser and navigate to the Network tab so you can view networw activity when you start the upload process. Now choose a file and you should start to see network activity:
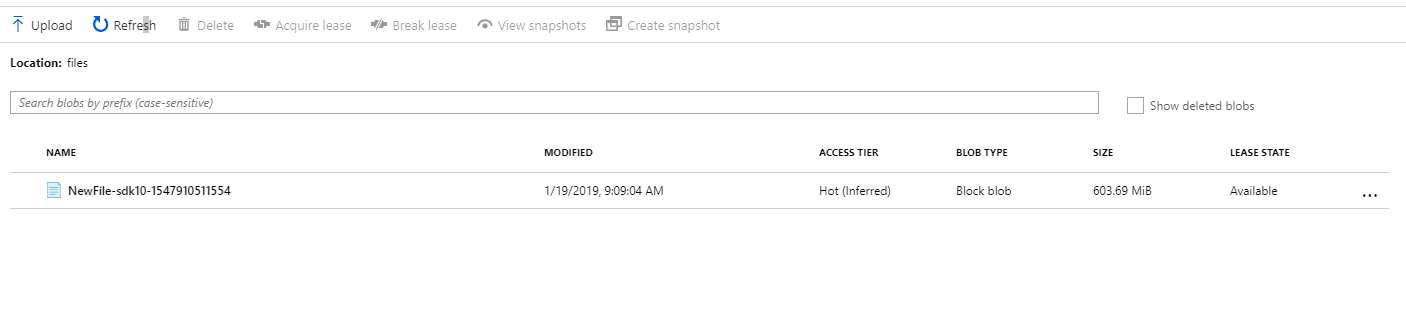
Navigate to the Azure Portal, select the Azure Storage Account and inside of the container, you should see your file:
 Final Thoughts!
This blog entry served as a introduction into how to use the Azure Storage SDK V10 for JavaScript library with Angular 7 to upload a file. It is not Production Level code and here are items that should be taken into consideration and/or improved upon:
- Instead of using a real Azure Storage Account, you could have used the Azure Storage Emulator
- The Front-End would probably call a Middle-Tier Service that is responsible for creating Containers & SAS Tokens programmically and passing it back to the Front-End
- The SAS Tokens would be short-lived and have dramatically less permissions then what was given in this blog entry
- CORS configuration for the Azure Storage Account would be more restrictive then what was given in in this blog entry
- The Front-End would typically allow for multiple uploads and implement drag and drop functionality along with allowing the user to choose a file manually
- The options passed to the uploadBrowserDataToBlockBlob method should be configurable