![]()
I recently setup Plex Media Server on my Ubuntu 14.04 Server. I wanted to write a blog post on how I went about doing it.
The Tools I Used?
- Ubuntu 14.04
- FileZilla
- Firefox
- Putty
What I Already Had?
- A Ubuntu 14.04 Server
- root or permissions similar to root
- Experience with Ubuntu 14.04
- A Plex user account
Caveat!
I already had Plex Media Server running on one of my Windows machines at home. Before I installed Plex Media Server on my Ubuntu Server, I uninstalled Plex Media Server on my Windows machine. If you do not do this, when you try to log into your Plex Media Server on Ubuntu, it will log you into the existing Plex Media Server running on the Windows machine. Stoping Plex Media Server from running will not work either because if the Windows machine reboots, it will re-start the Plex Media Server.
Step 1 - Initial Install
I downloaded the latest version of the Plex Media Server from Plex’s official site, which you can find here. To find out what bit version of Ubuntu I had, I typed the command:
unamme -i
I then used FileZilla to upload the “.deb” file to my home directory.
Next, I navigated to Plex’s official guide on how to install Plex Media Server on Ubuntu, which you can find here
- I enabled repository updating
- I ran the command to run the “.deb” file I uploaded
After Plex Media Server is installed, it will create a new user called “plex”. This user will need write and execute permissions on the directory where you will store your media. I confirmed that this user was created by running the command below, which will show all users and the plex user should be one of them:
compgen -u
Step 2 - Permissions
Next, I logged into my Ubuntu Server using Putty and in my home directory, I created a directory called ‘My Plex’ using the following command:
mkdir 'My Plex'
Inside of this directory, I made the following sub directories:
My TV Shows
My Movies
I then made the “plex” user the owner of the My Plex directory by executing the following command:
sudo chown -R plex: ~/'My Plex'
I then granted elevated priviledges to my ssh login that will be used to upload media to the “My Plex” sub directories. I did this by executing the following command:
sudo chmod -R 777 ~/'My Plex'
After this, the plex user should have sufficient permissions to operate and your normal login should have sufficient priviledges to read, write and delete your Plex media content.
Step 3 -Log into the Plex Media Server via localhost
Now that my Plex Media Server has been installed and I have setup sufficient directory permissions on Ubuntu, I now needed to log into the Plex Media Server via SSH Tunnel. I needed to do this because I have to “simulate” access as if I had actually remoted into the Server and was browsing locally.
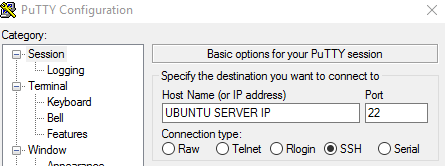
First, I opened up Putty and entered my Ubuntu Server IP Address:
Next, in the left navigation, goto Connection->SSH->Tunnels. For “Source Port”, I entered “9999” and for the “Destination” radio buttons, chose “Dynamic”.
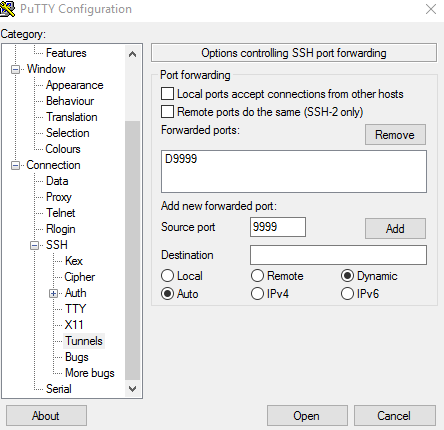
Next, I went back to Session and saved my settings. After this, I pressed the “Open” button and logged into my Ubuntu Server.
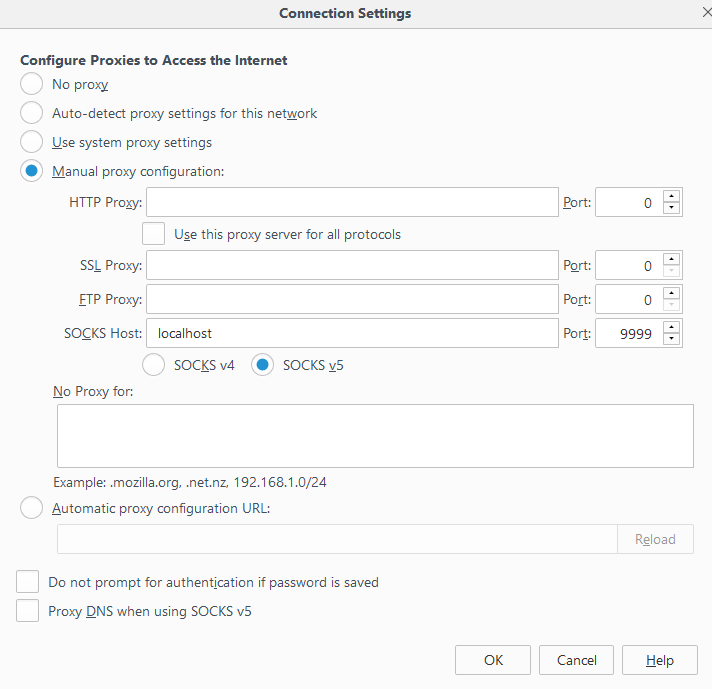
Next, I opened up Firefox, navigated to Options->Advanced->Network->Settings and entered settings so my final screen looked like the below:
To ensure that I was now browsing through my SSH Tunnel, I used whatismyipaddress.com/ to verify that my IP Address was my Ubuntu Server’s IP Address.
Finally, I navigated to http://localhost:32400/web to log into my Plex Media Server. I entered my Plex credentials and I started configuring Plex.