Hi there!
In this blog post, I will be demonstrating how to convert an SVN Repository to Stash using TortoiseGit with all of your SVN commit history.
Caveat
There are many ways to convert an SVN repository to a Stash repository, the following is a tutorial for how I recently converted a project hosted in SVN to a Stash repository. The developer who worked on this project before me had already put roughly the last 100 commits into Stash. However, this person left the project before I joined and I was not able to do any knowledge transfer.
I continued to use SVN until I had time to learn how to convert the SVN repository to Stash and understand what changes needed to be made in the project’s TeamCity configurations to start using Git.
Also, this tutorial assumes that you have a basic understanding of SVN and Stash.
What do you need?
- TortoiseGit - TortoiseGit will be used to convert your SVN branch to a Stash branch.
- SVN Repository Access - You will need the SVN branch url and permission to access the SVN branch that you would like to convert to Stash.
- Stash Repository Access - The new remote Stash repository for your new project needs to have already been created or you need to have permission to be able to create a new repository.
Step By Step!
Step 1. Create the new Stash repository. The sample repository name that I will be using is greensharesthoughts.tutorial
Step 2. Once the repository has been created in Stash, clone the new Stash repository in a temporary directory. You are doing this because you want to get the settings in the local .git/config file.
Step 3. Once the Stash repository has been cloned, inside of the cloned directory, Right-click on the mouse and select TortoiseGit then select Settings and choose Edit local .git/config file and copy the settings to a text editor such as Notepad++ for future reference.
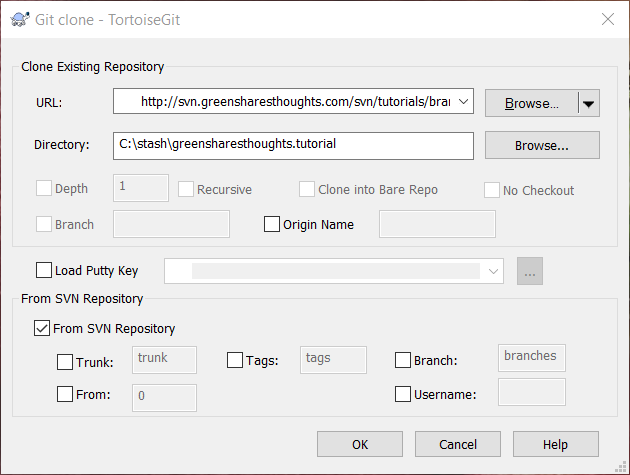
Step 4. Navigate to the directory where your permanent Stash repository will be stored. Inside of this directory, Right-click and select Git Clone. On the clone screen:
- Enter the SVN Repository URL of the branch you want as your master. Example: http://svn.greensharesthoughts.com/svn/tutorials/branches/prod
- Enter the Directory. Example: C:\stash\greensharesthoughts.tutorial
- Next, select the From SVN Repository checkbox and uncheck every checkbox below this option
- Press OK and allow TortoiseGit to convert the SVN Repository to a Stash Repository, this will take a while, depending upon the size of your SVN branch

Step 5. Once the conversion is complete, you should see your repository files. Inside of the repository root directory (in my case, C:\stash\greensharesthoughts.tutorial), you will want to Right-click , select TortoiseGit, select Settings and select Edit local .git/config and overwrite the settings with the Git settings that you copied from the temporary Stash directory you downloaded earlier and save these changes (Step 3).
Step 6. As you Right-click, you will notice that there are SVN options on the context menu for TortoiseGit. To remove this, you will want to navigate to the root directory (in my case, C:\stash\greensharesthoughts.tutorial) and inside of this directory, find the .git folder (you may have to allow hidden folders to be seen in your Windows settings). Inside of this folder, there should be a folder called svn. Delete the svn file and the SVN options should be removed from your TortoiseGit context menu.
Step 7. Next, using TortoiseGit, you will want to do a pull (if there is code in the remote repository, which was the case for me) and fix any merge issues.
Step 8. Once all merge issues are fixed (if any), using TortoiseGit, you will want to do a commit and then push to the remote Stash repository and you have now converted your SVN repository to a Stash Repository with all of your SVN commit history.
Final Thoughts!
The project that I worked on had a very small codebase and I was the only developer on the project. If the project had been larger, I would have probably waited until the last push to Production occurred. I would then suspend all development (probably over the weekend) and merge all relevant branches into my SVN pristine/prod branch, so all needed changes are in one branch. Next, I would perform all of the steps mentioned in this tutorial and once the SVN repository has been converted to Stash (master), I would then start re-creating the branch structure I used in SVN ie Development, QA, Pre-Prod, Prod etc etc and then development would continue.