![]()
One of my co-workers recently asked me if I could help him with the task of automating some of our client’s database processes using Stash (Git), PowerShell, SQL Server Data Tools (SSDT), SQL Server and TeamCity. After doing some research and proving out that this task could be done, I decided to write a very basic tutorial on how to automate the deployment of a SQL Server database using Git, Powershell, SQL Server, SSDT and TeamCity.
Caveats
This tutorial assumes that you are familiar with Git, PowerShell, SQL Server 2014, Visual Studio 2015, SSDT, TeamCity and that you have the proper access and permissions to complete this guide.
Tools Needed!
- Git
- PowerShell
- SSDT
- SQL Server 2014
- TeamCity 10+
- Visual Studio 2015
Objective
For this tutorial, you will create two SQL Server databases, one called Development and another called QA. You will manage changes to your Development database using SSDT. When you check in your changes to Github, your changes will automatically be pushed to the QA database.
In the real world, you would probably have a Git Branch for Development and one for QA. In TeamCity, you probably would have Build Configurations for each branch and when you checked in changes to either branch, it would then deploy to the associated SQL Server database. For this tutorial, I wanted to keep things simple, so the two databases are on my local machine and when you check in changes to the master branch, it will deploy your SQL Server changes to the QA database.
Overview
- Create SQL Server 2014 Databases
- Create an SSDT Project using Visual Studio 2015
- Create a Github Repository for your SSDT Project
- Create a PowerShell script to deploy your SSDT Project to QA
- Setup a TeamCity Project to automate the deployment of your SQL Server database
- Test the Continuous Deployment of Your Database
Create SQL Server 2014 Databases
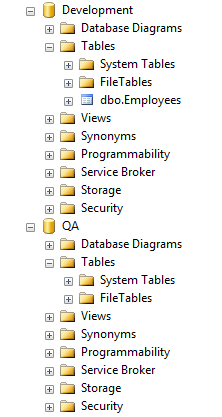
Open up SQL Server Management Studio and create two databases. Call one of them Development and the other one QA.
In the Development database, create a table called Employees. You can add any fields that you want but I have chosen to add an Id, FirstName and LastName. I have made my Id field the Primary Key.
Create an SSDT Project using Visual Studio 2015
Open up Visual Studio 2015. If you have not updated SSDT, do so by navigating to the Extensions and Updates menu item, under Tools.
Under the SQL Server Object Explorer, add a reference to your SQL Server by right-clicking on SQL Server and choose Add SQL Server. Fill out all the pertinent information to connect to your SQL Server. After you are done, you should see a reference to your SQL Server in the SQL Server Object Explorer.
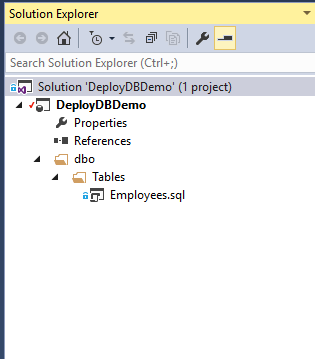
For the SQL Server you just added, navigate to the Databases folder, select Development. Right-click Development and choose Create New Project and fill out all the pertinent information to create the SSDT Project. After you are done, you should see your SSDT Project in the Solution Explorer.
Create a Github Repository for your SSDT Project
Navigate to the root directory that contains your SSDT Project and create a folder called Scripts. This folder will contain your PowerShell script we will create later in this tutorial.
Create a local Git Repository in the folder where you created the SSDT project
Once this has been done, go to Github and create the remote repository and get the Github url
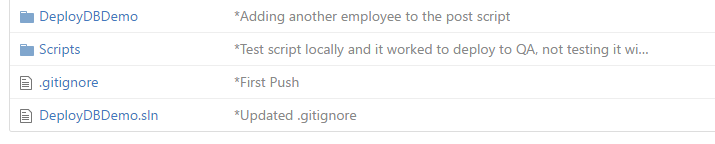
Push your local repository to Github
Your Github Repository should look similar to the one below:
Create a Powershell script to deploy your SQL Server database to QA
Open up Windows PowerShell ISE
Copy the PowerShell script below into PowerShell ISE and save the script as deploy.ps1 in the Scripts folder that you created in the root directory of the SSDT project. DeborahK provided this PowerShell script and has a nice blog explaining the script. You can find her blog here.
                    #--TeamCity checkout directory command line argument--
      param([string]$tcDir = "")
                    #--Load the Dac.dll into the PowerShell session--
      Add-Type -Path "C:\Program Files (x86)\Microsoft SQL Server\120\DAC\bin\Microsoft.SqlServer.Dac.dll"
                    #--Load the SQL Server instance--
      $dacService = new-object Microsoft.SqlServer.Dac.DacServices "server=(local)"
                    #--Load the DACPAC--
      $dacPac = [Microsoft.SqlServer.Dac.DacPackage]::Load("$tcDir\DeployDBDemo\bin\Release\DeployDBDemo.dacpac")
                    #--Deploy your database--
      $dacService.deploy($dacPac, "QA", "True")
Make sure you modify the Add-Type Path, the $dacService server and $dacPac Load information based upon your particular environment and save your changes. Also note that I have added a command line argument ($tcDir) that TeamCity will pass to the PowerShell script during execution (this will be explained later).
Commit and Push your changes to your Github Repository
Setup a TeamCity Project to automate the deployment of your SQL Server database
Navigate to your TeamCity Server, under Administration, Create a new Project, enter in all relevant information and save.

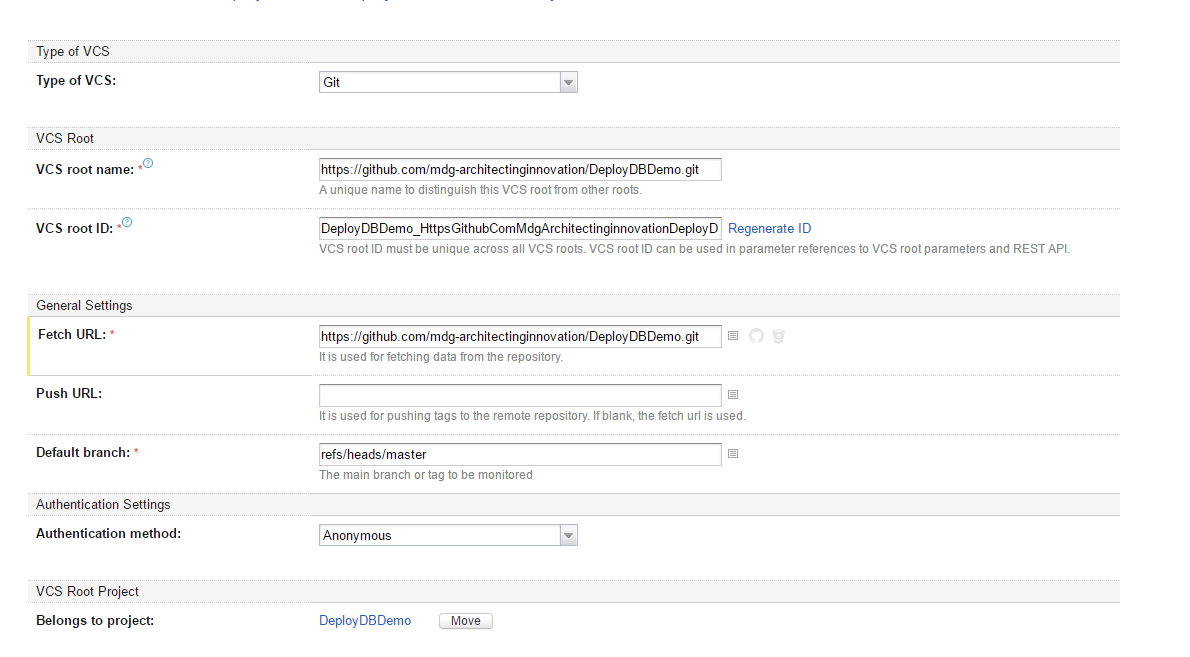
After the Project Root has been created. Edit the Project, on the left menu, choose VCS Roots and click the Create VCS Root button to reference your Github Repository. Select the VCS, enter the VCS root name, Fetch URL and the Default branch. Ensure that the connection is working by clicking the Test connection button and save.
Edit the Project, then under General Settings, click the Create build configuration button. Enter the name for this build configuration.

Edit the build configuration and on the menu on the left, choose Version Control Settings and press the Attach VCS root button. Choose the Git Repository you added in the Project Root Settings under the Attach existing VCS root drop down and press the attach button
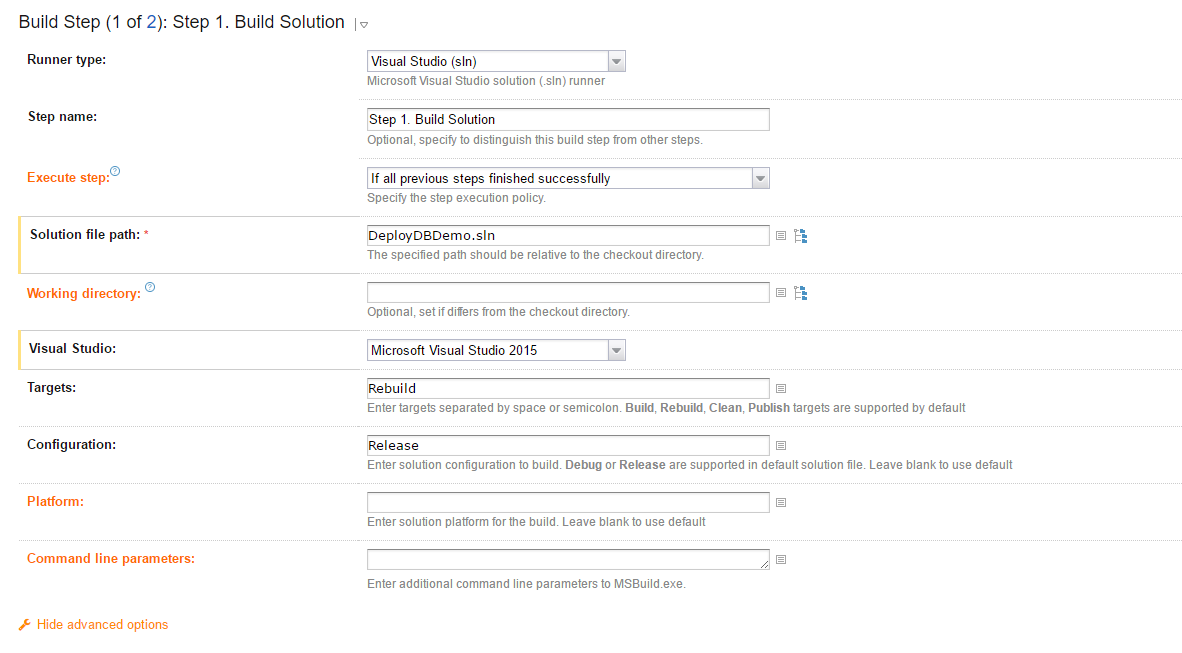
Next, select the Build Steps menu item. Click on the Add build step button. Choose Visual Studio (sln) for the Runner type, give your step a name, set the Solution file path and Visual Studio version and save.
Next, click on Build Steps again, click the Add build step button. For the Runner type, choose PowerShell. Enter a step name. Change the Format stderr output to error, Script should be File and set the path to the deploy.ps1 file that you created. In the Script arguments enter the script below and save:
-tcDir %teamcity.build.checkoutDir%This variable contains the TeamCity Git checkout directory, which the deploy.ps1 script will need to find the (.dacpac) file that SSDT generates when you build your SSDT project.

Next, click Triggers and click the Add new trigger button. In the Add New Trigger drop down, select VCS Trigger and save
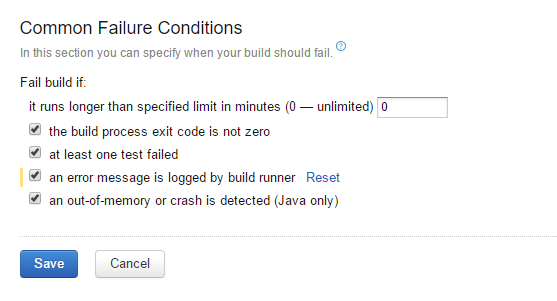
Next, click Failure Conditions and check an error message is logged by build runner and save.
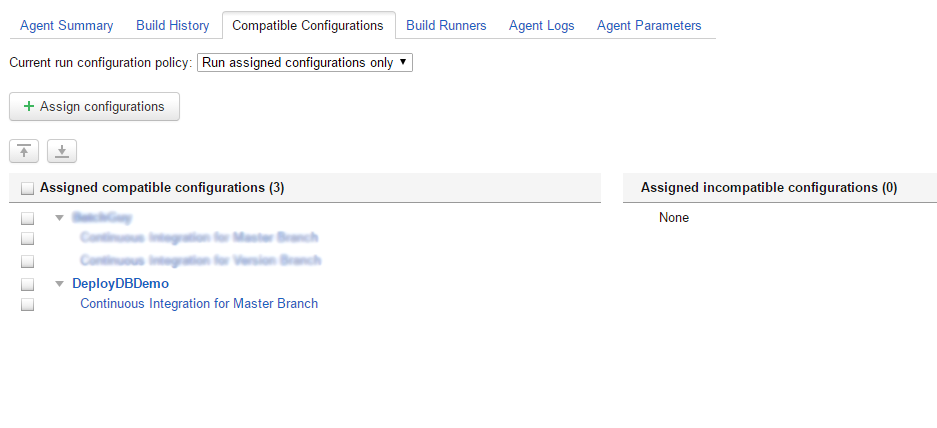
Next, if your new Project doesn’t have an Agent assigned to it, on the top menu, select Agent. Select an available agent in the Connected tab. Select the Compatible Configurations tab. In the Current run configuration policy drop down, choose Run assigned configurations only. Click the Assign configurations button and choose the build configurations that you just created.
Test the Continuous Deployment of Your Database
Now that we have finished all of our steps, we need to make some changes to our SSDT Project, push those changes to Github, verify that TeamCity executes with no errors and that our changes are being deployed to the QA database.
In Visual Studio, in Solution Explorer, find Employees.sql, double click this file and re-name the Id field to EmployeeId.
Add a new varchar(50) field called Title
Once you save and build the SSDT project, a (.refactorlog) file will be created. Commit and push your changes to Github and make sure you add the (.refactorlog) file
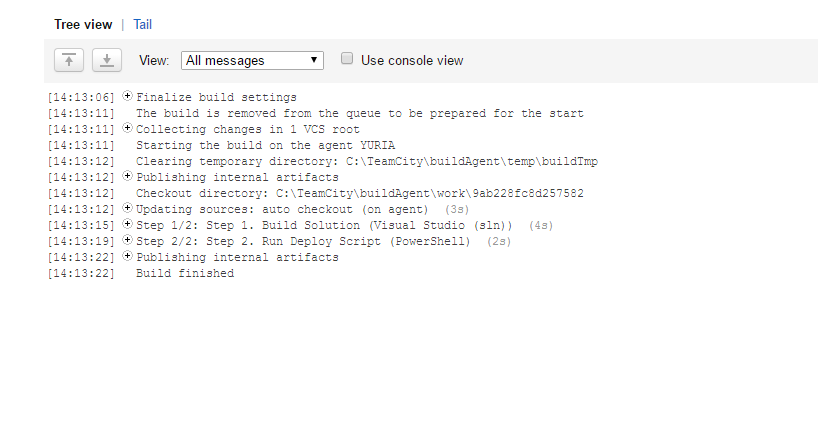
Navigate to your TeamCity server and ensure that the build configuration starts and completes with a success status.
Your Build Log should look similar to the picture below:
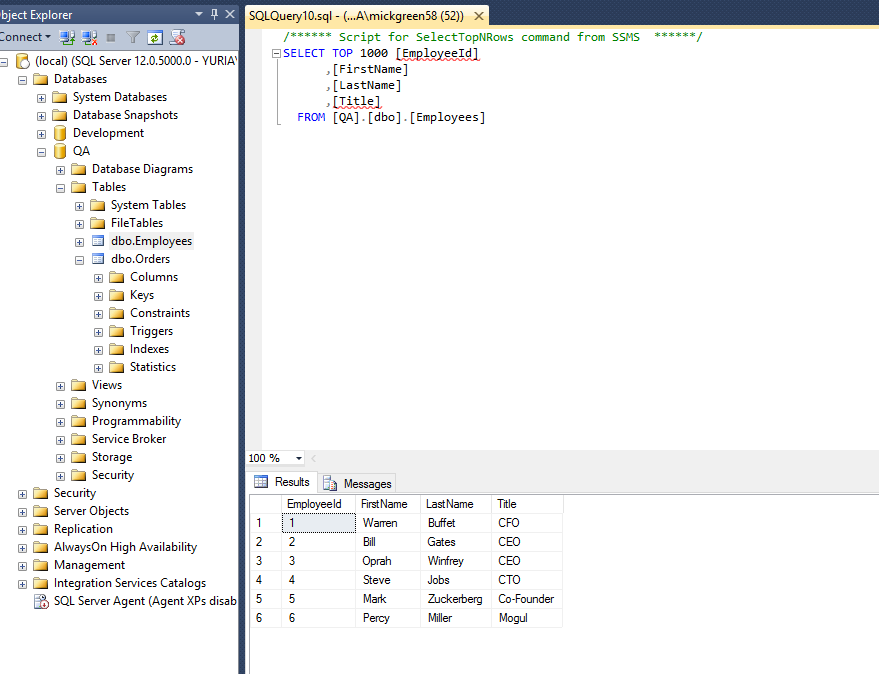
Next, verify that your SSDT Project changes have been deployed to your QA database.
Next, were going to populate the Employees table with data and create a new table called Orders that will contain the EmployeeId as a Foreign Key.
In Solution Explorer in Visual Studio, right-click the project and choose Add and Scripts and choose Post-Deployment Script.
Double-click on the Post-Deployment Script and paste the following SQL script and save:
    IF (EXISTS(SELECT * FROM [dbo].[Employees]))
    BEGIN
     DELETE FROM [dbo].[Employees]
    END

    INSERT INTO [dbo].Employees VALUES ('Warren', 'Buffet', 'CFO')
    INSERT INTO [dbo].Employees VALUES ('Bill', 'Gates', 'CEO')
    INSERT INTO [dbo].Employees VALUES ('Oprah', 'Winfrey', 'CEO')
    INSERT INTO [dbo].Employees VALUES ('Steve', 'Jobs', 'CTO')
    INSERT INTO [dbo].Employees VALUES ('Mark', 'Zuckerberg', 'Co-Founder')
    INSERT INTO [dbo].Employees VALUES ('Percy', 'Miller', 'Mogul')
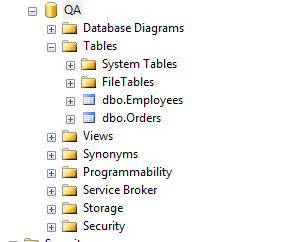
- Next, in Solution Explorer, right-click on the Tables folder and choose Add and Table. Name the table Orders, create a field called OrderId, set it as the Primary Key. Create a field called EmployeeId and make it a Foreign Key reference to the EmployeeId in the Employees table. Below is the SQL script:
    CREATE TABLE [dbo].[Orders] (
        [OrderId]    INT IDENTITY (1, 1) NOT NULL,
        [EmployeeId] INT NOT NULL,
        CONSTRAINT [PK_Orders] PRIMARY KEY CLUSTERED ([OrderId] ASC),
        CONSTRAINT [FK_Orders_Employees] FOREIGN KEY ([EmployeeId]) REFERENCES [dbo].[Employees] ([EmployeeId])
    );
- Commit your changes to Github, verify that TeamCity executes and completes with no errors and that the Employees table now has data and the Orders table has been created in the QA database.
Issues?
One issue that I noticed is that if I made a change directly on the database server, used SSDT’s schema compare to push the changes to the database project and pushed my changes to Github, the changes would not get deployed to the QA database. The problem was only resolved when I made database changes in the SSDT Project and pushed my changes to Github.
Final Thoughts!
As a software developer, it was an absolute joy to get the chance to help automate our client’s database processes. Although this tutorial was very basic, it was a nice learning experience to be able use Git, PowerShell, SQL Server, SSDT and TeamCity to automate database deployments. You will probably want to enhance the PowerShell script by adding error handling and possibly making some of the hard-coded paths command line arguments that can be passed in. I hope you enjoyed this blog and more importantly, I hope it will be beneficial to you.