![]()
In this blog entry I want to demonstrate how to SSH into an Azure Virtual Machine using an Azure DevOps Hosted Agent, Azure Key Vault and Bash.
Prerequisites!
- azure-cli
- Azure DevOps
- Azure Subscription
- Bash
- GitHub Account
- Ubuntu
Caveats!
This blog entry is not an exhaustive tutorial on Azure, Azure Virtual Machines, Azure DevOps, Azure Key Vault, Bash, Docker, Public Key Encryption or the SSH Protocol. This blog assumes the reader has a fundamental knowledge of the aformentioned technologies and concepts.
Also, in this blog entry I open up a number of ports on an Azure Virtual Machine. For brevity and to keep this guide as simple as possible, the “best” security practices are not used when opening these ports and should not serve as an example for a live environment.
I will be using this repository, which contains 2 Bash scripts that will install a Private Key on an Azure DevOps Hosted Agent and deploy the ASP.Net Core Sample Docker container to an Azure Virtual Machine. You will need to clone the GitHub repository.
Please view the README for a detailed description of how the Bash scripts work.
Background!
On my latest project here at Microsoft, we are using Terraform to deploy our infrastructure to the Azure Cloud. One of the resources that is deployed are Virtual Machines that run docker containers and the information about these Virtual Machines (username, ip address etc etc) is stored in an Azure Key Vault via Terraform. To automate the container deployment process, we needed to create a Azure DevOps Pipeline that would:
- Retrieve the username & IP Address of the Virtual Machine from Azure Key Vault
- Retrieve an SSH Private Key that has been Base64 encoded from Azure Key Vault
- Install the SSH Private Key on the Azure DevOps Hosted Build Agent
- SSH into the Azure Virtual Machine and deploy a new version of a Docker container
Azure DevOps has a built in SSH Task to SSH into a Virtual Machine but unfortunately, the Service Connection this task uses requires you to hard-code the IP Address and Port into the Service Connection which would not work for us because we needed to have these values (along with other values) in an Azure Key Vault, which could be accessed programmically in order to support automating Docker container deployments to an Azure Virtual Machine.
Create and Configure Azure Resources!
Log into Azure:
az login
Create an Azure Resource Group:
az group create -l eastus -n {name_resouce_group}
Create an Azure Key Vault:
az keyvault create -n {name_of_keyvault} -g {name_of_group} -l eastus --sku standard
Now we need to create a Azure Key Vault secret that will contain a Private Key. For brevity, I am using the Private Key stored on my Hyper-V Ubuntu 18.04 development machine. If you are unfamiliar with generating SSH Key Pairs on Ubuntu, please see the tutorial on ssh-keygen.
# copy private key into a variable, Base64 encode the variable and save it into the azure key vault as a secret
# we Base64 encode the private key to preserve the characters
privatekey=$(base64 ~/.ssh/id_rsa) && az keyvault secret set -n {name_of_secret} --vault-name {name_of_key_vault} --value "$privatekey"
To test that the Private Key was saved, you can run the following command:
echo $(az keyvault secret show -n {name_of_secret} --vault-name {name_of_key_vault} --query 'value' --output tsv) | base64 -di
We now need to create an Azure Virtual Machine, so we can store the username & IP Address in Azure Key Vault:
Since we will be using SSH, I need to copy “Public” key located on my Hyper-V development machine, which will be copied to the Azure Virtual Machine’s authorized_keys directory:
cat ~/.ssh/id_rsa.pub
In the Azure Portal:
- Choose Virtual Machine and Add a Virtual Machine
- Choose Ubuntu 18.04 LTS as the OS
- Choose a name
- Choose a Resource Group
- Copy the “Public” key into SSH Public Key text area
- Change the size of the Virtual Machine to a “Standard B1ms”
- Choose to open port 22 (SSH)
- Choose a Standard HDD
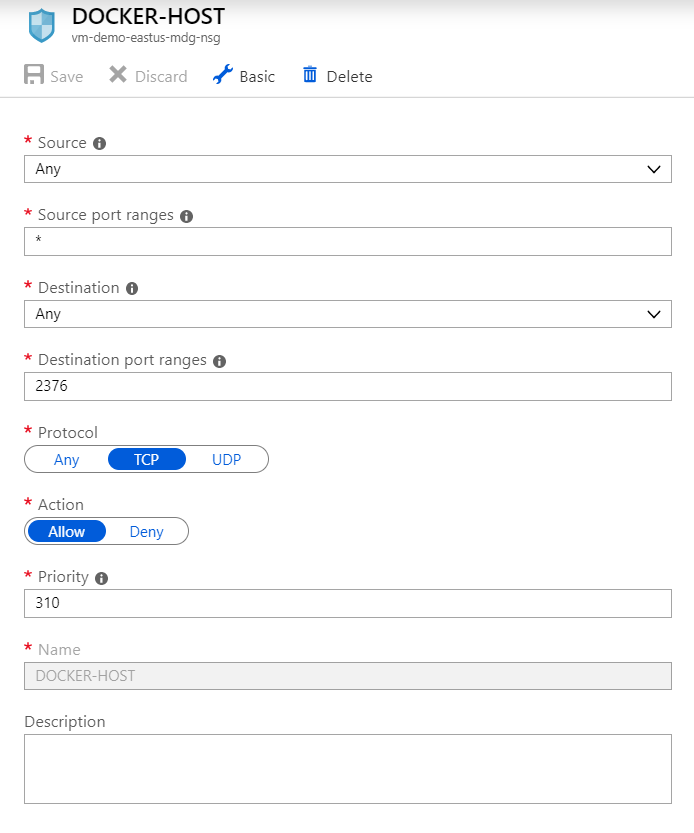
Once you have done this, review and create the Virtual Machine. We will need to open a few other ports:
- Choose Networking
- Choose “Add inbound port rule”
- Add an entry for Ports 2376 (docker daemon encrypted communication port) and 8000 (port used by the ASP.Net Core Sample App)
As noted, only do this for learning purposes and always follow proper security protocols for live environments.

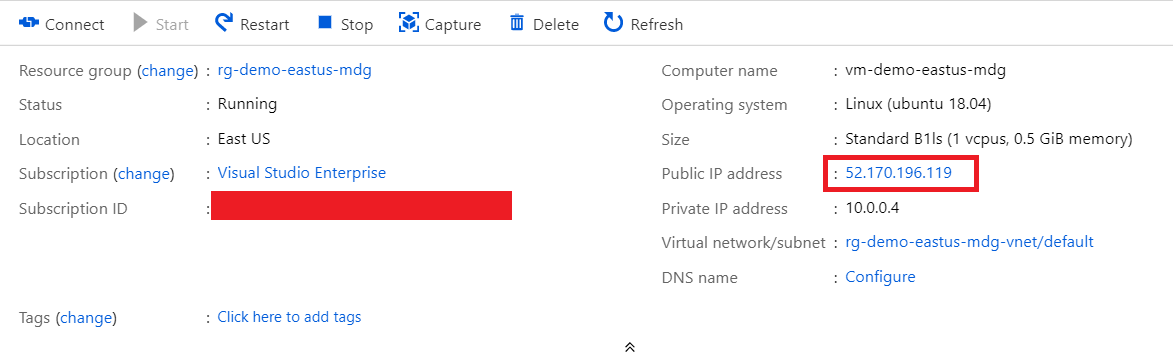
We need to now SSH into the Azure Virtual Machine and install docker. You can find the IP Address of the Virtual Machine in the Overview blade:
SSH into the Virtual Machine and install Docker:
ssh {username_of_virtual_machine}@{ip_address_of_virtual_machine}
Use the official Docker guide to install Docker on Ubuntu.
We will also want to place the Virtual Machine user in the docker group:
sudo groupadd docker && sudo usermod -aG docker $USER
We will need to reboot for the changes to take effect:
sudo reboot
We need to store the Virtual Machine username and IP Address in Azure Key Vault as secrets:
    az keyvault secret set -n vm-ip-address --vault-name {name_of_key_vault} --value {ip_address}


    az keyvault secret set -n vm-ip-address --vault-name {name_of_key_vault} --value {virtual_machine_username}
Here are the secret names I used:

Create a Azure DevOps Release Pipeline!
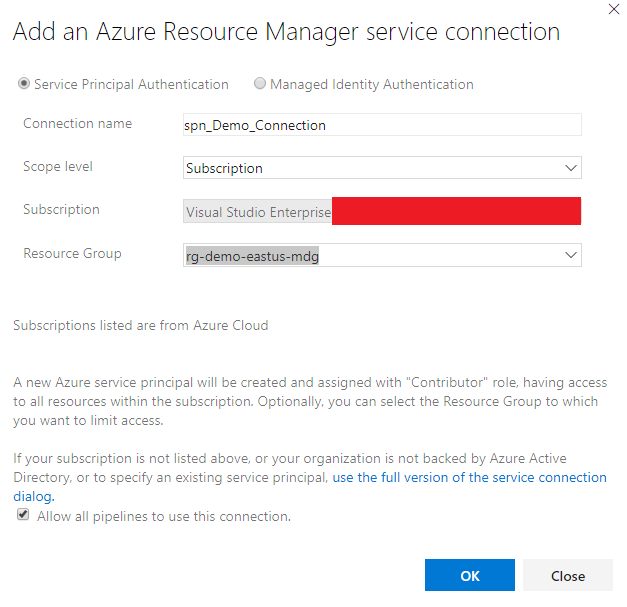
We now need to let Azure DevOps create a Service Principal, which will be used to execute our Bash scripts.
In Azure DevOps:
- Create a new Project
- Inside the Project, choose Project Settings
- Choose Service Connection
- Choose Azure Resource Manager
Fill in the appropriate information. The end result should be something similar to the picture below:
After the Service Principal has been created, select the Service Principal and choose “Manage Service Principal”. You will be taken to the Azure Portal where you can copy the display name of the new Service Principal Azure DevOps created.
We need to grant the new Service Principal the correct permissions to be able to retrieve values from the Azure Key Vault. In the Azure Portal:
- Choose the Azure Key Vault that was created
- Choose the “Access policies” blade
- Choose “Add new”
- Paste the Service Principal name in the search bar to find the Service Principal
- Grant Get and List permissions, similar to the image below

Now let’s create the Release Pipeline that will execute the Bash scripts.
In Azure DevOps:
- Choose Pipelines
- Choose Releases
- Create a New Release Pipeline
- Select the GitHub Repository you cloned as the Artifacts
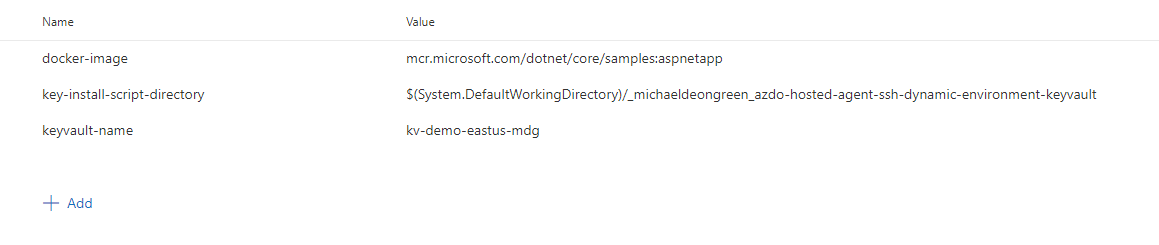
We need to create the variables that the “aspnetcoreapp-deploy.sh” uses:
Under the “Variables” tab, create the following variables:
- docker-image: mcr.microsoft.com/dotnet/core/samples:aspnetapp
- key-install-script-directory: $(System.DefaultWorkingDirectory)/{azuredevops_artifacts_directory_name}
- keyvault-name: {key_vault_name}
We now need to create a few tasks. Under the “Tasks” tab, choose “Agent job” and make sure “Hosted Ubuntu 1604” is selected.
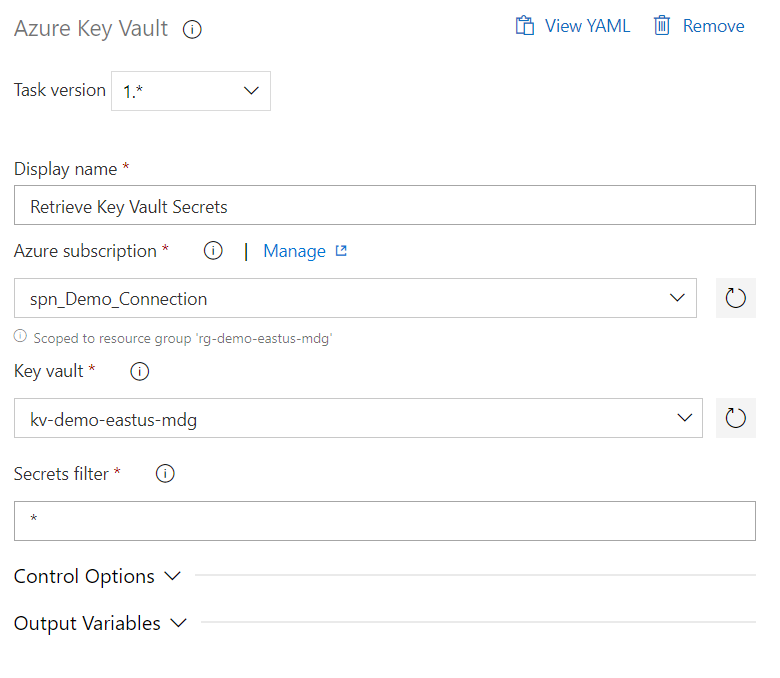
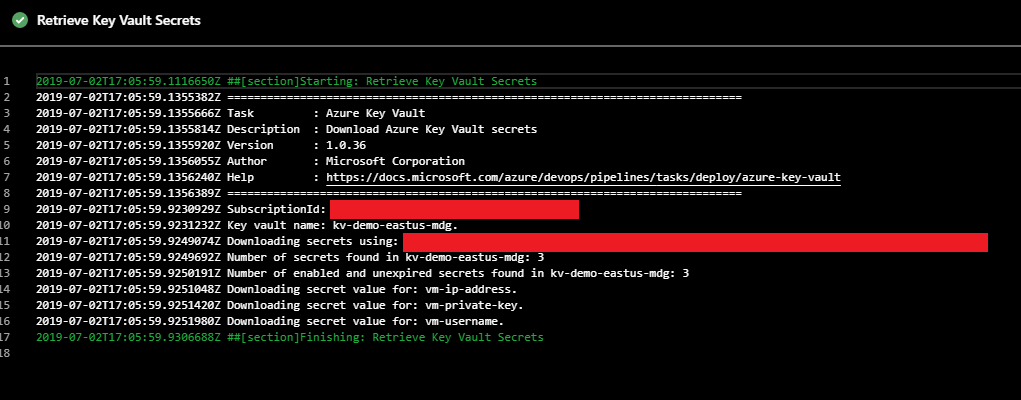
Next, create a Azure Key Vault task (this task will create variables with the same exact name as the secret name in the Azure Key Vault):
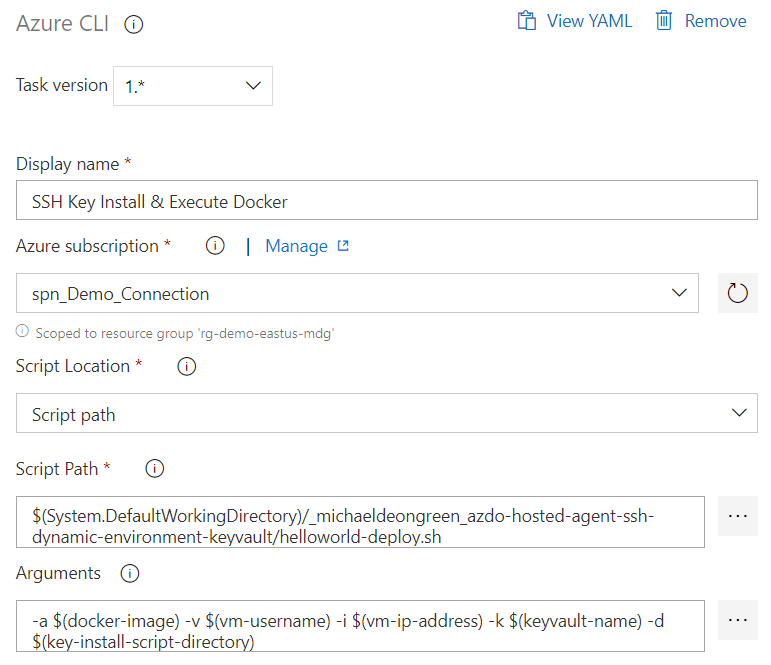
Next, we will create an Azure CLI task that will execute the Bash scripts:
- Choose the Service Connection we created and configured earlier
- Choose Script path and choose the aspnetcoreapp-deploy.sh Bash script
- Set the arguments: -a $(docker-image) -v $(vm-username) -i $(vm-ip-address) -k $(keyvault-name) -d $(key-install-script-directory)
Run Azure DevOps Release Pipeline & Test ASP.Net Core Sample Application!
Now that we have created the Release Pipeline, we can hit the “Create release” button at the top right to create a release.
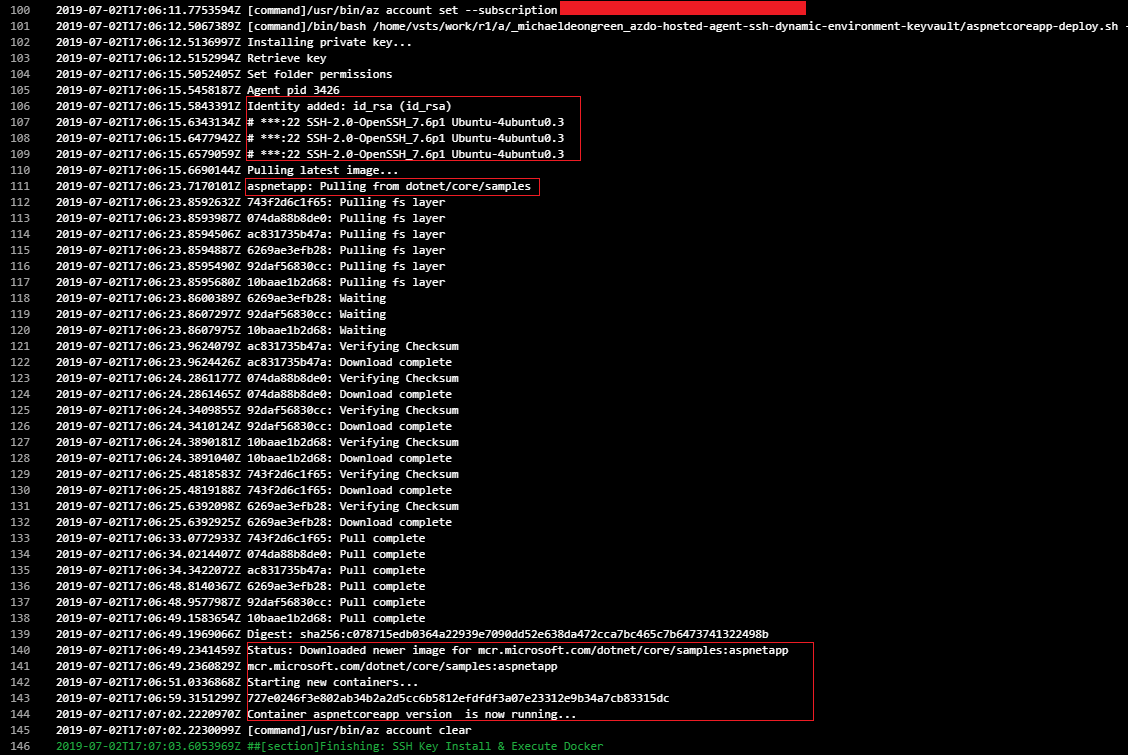
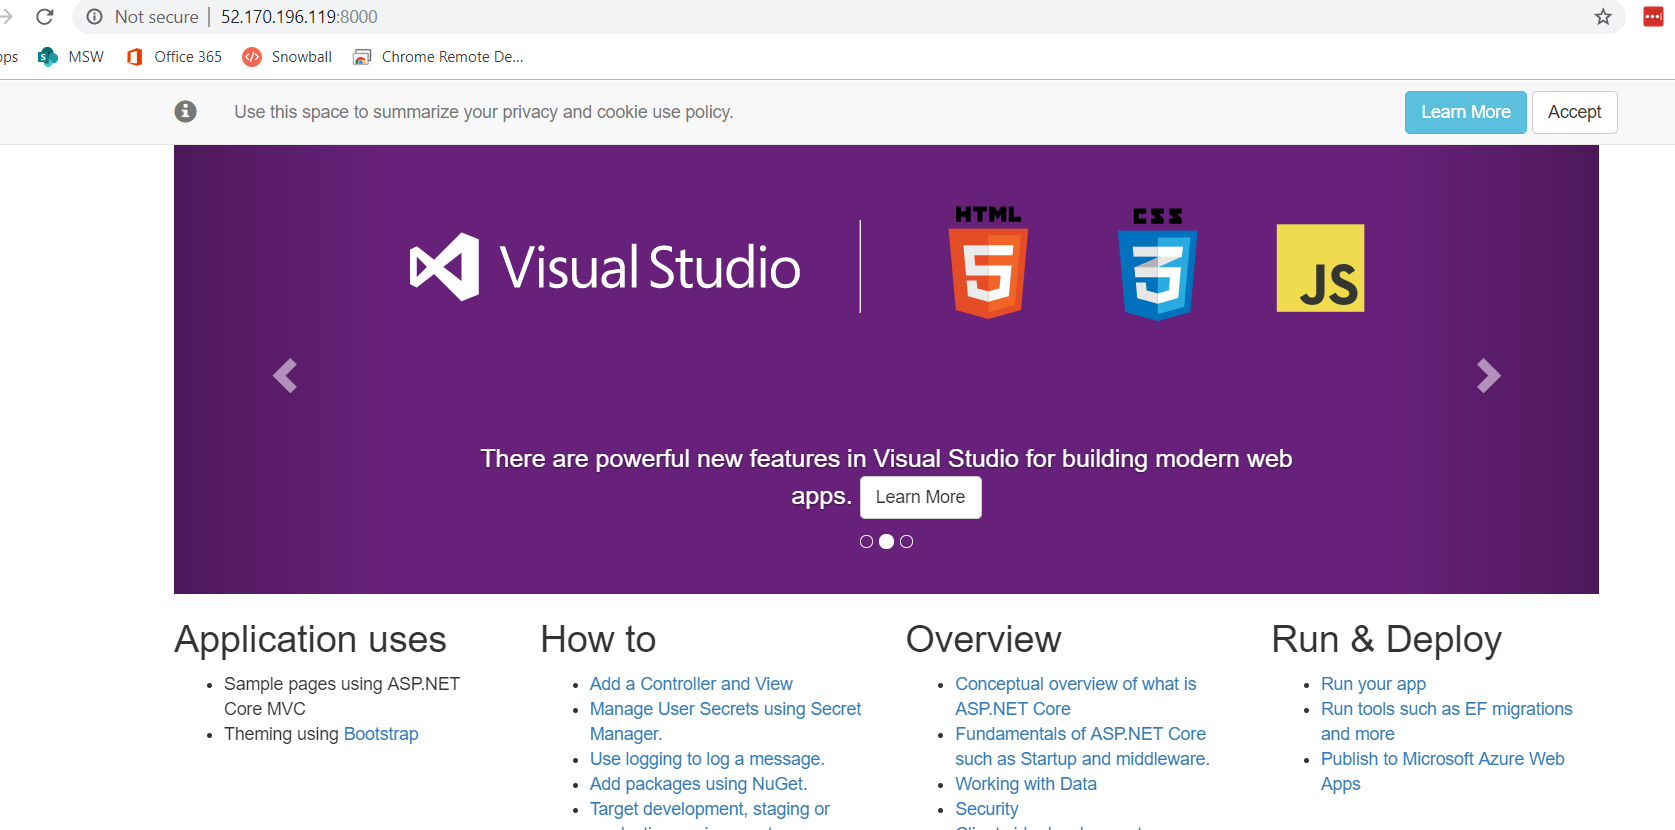
Testing the ASP.Net Core Sample Application by navigating to “http://{virtual_machine_ip_address}:8000”